
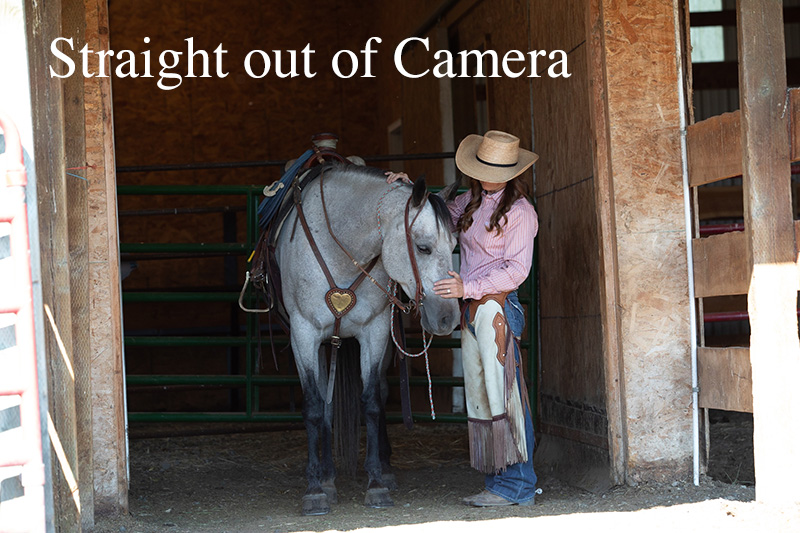
Black background shooting is a "must" for equine photographers these days. It is a technique we teach at all of the Cowgirls with Cameras experiences. As you can tell, this image started out rough out of camera — and that is true of many black background images. You can minimize the editing time if you get the time of day right and have a good location. In the times when those two things are less than ideal, you will need to spend more time in Lightroom or Photoshop to get the desired result.
This image was taken at the Art of the Cowgirl Montana Gathering Photography clinic Phyllis Burchett and I do in the summer in Montana. We had been out in the field shooting all morning and added some black background education on the tail end of a wonderful ranch life/riding set of locations. This barn faces east and it has an overhang. As you can tell, by the time this image was shot, the sun was getting really right and edging itself under the overhang and into our working space! We had to be careful in positioning the models and their horses inside the light line far enough to be able to capture a good image.
This model was very experienced and followed directions very well. Her horse was very easy to work with as well. We are so lucky at our clinics and workshops to have cowgirl models who have amazing horsemanship skills and horses that are well trained and cooperative.
Capture info:
August 20, 222 at 10:01:37 am MT
Canon EOS 5D Mark IV
130mm (EF70-200 f/2.8L USM)
2847x4269 (6720x4480) 71 MB
1/400 sec, f5, ISO 640
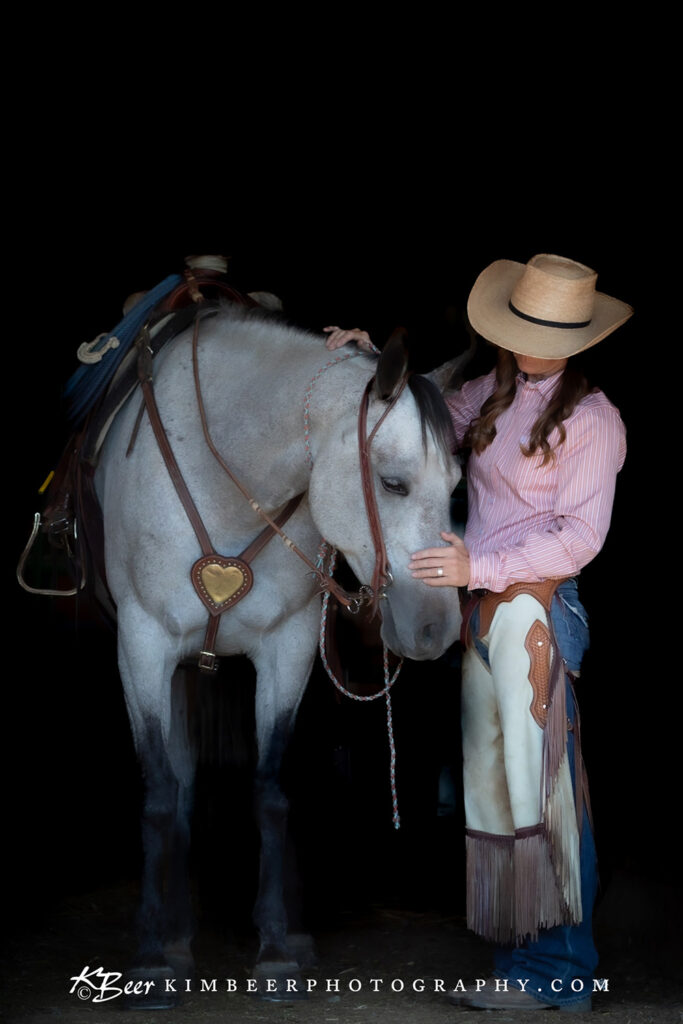
From SOOC to Finished Black Background
After the image capture, the true work on a black background begins. For this image, I edited it inside Lightroom. Adjustments to the base image were minimal and included adjusting the black point to -17 and adding a vignette of -41 to begin the transition to black background. I changed the crop from horizontal to vertical and straightened up my horizon. The image sat in my iPad for several months with these edits. I pulled it out to finish today and that included adding a background mask in Lightroom.
I began this process by selecting the subject and then inverting the mask. There are other ways to do this, but this was my choice today. The wonderful and frustrating thing about Adobe products is that there are a 100 roads to every destination.
The first step was to take the initial inverted mask and get the setting correct. I adjusted the exposure down, and really tamped down the blacks to black out all the detail in the background.
Now that I could see what I was doing, I began perfecting the mask. The image above shows the mask about 1/2 way through this process. The original selection resulted in the area around the model and horse's feet being completely black, and the area in between them being bright and revealing of the gate and objects behind them. The area to the right and left seemed okay. At the top, as you can see here, the mask took the horses right ear. No bueno. Using my brush and the + and - for adding and subtracting, I brushed in the details I wanted to keep and brushed out the details I wanted to fade into black. Around the models feet and on the ear both, I used the opacity of my brush to achieve the effect I wanted.
Once my mask was finished, I went back to the main editing screen and adjusted the clarity and texture to soften the feel. I also added some noise reduction under luminosity to further create the soft effect I wanted in this image. Finally, I removed two distractions that were bothering me, a spot on the model's chinks around her right knee and the breast collar strap between the horse's legs.
The final edited image is above. The moral to this image's story is that, as a photographer, you must be able to see both the image you want to make and the potential of the image you capture in camera.
If you are interested in learning the skills and techniques needed to create black background — or for that matter, any image style you want! — consider joining us at a Cowgirls with Camera's event. We teach this and many other useful skills for both hobbyists and professionals. Our Beginner Workshop in April and our Advanced Experience in August are the perfect compliment to your growth as a photographer and they are fun as well!